SpringCloud之Eureka
【前面的话】SpringCloud为开发人员提供了快速构建分布式系统的一些工具,包括配置管理、服务发现、断路器、路由、微代理、事件总线、全局锁、决策竞选、分布式会话等等。它配置简单,上手快,而且生态成熟,便于应用。但是它对SpringBoot有很强的依赖,需要有一定基础,但是SpringBoot俩小时就可以入门。另外对于"微服务架构" 不了解的话,可以通过搜索引擎搜索"微服务架构"了解下。另外这是SpringCloud的版本为Greenwich.SR2,JDK版本为1.8,SpringBoot的版本为2.1.7.RELEASE。
壹、新建父工程
- 新建一个Maven父工程lovincloud,便于版本管理,然后删除src文件夹
添加pom依赖和SpringCloud和SpringBoot的版本
org.springframework.boot spring-boot-starter-parent 2.1.7.RELEASE com.eelve.lovincloud lovincloud 1.0-SNAPSHOT pom lovincloud http://maven.apache.org UTF-8 Greenwich.SR2 1.8 org.springframework.boot spring-boot-starter-test test org.springframework.cloud spring-cloud-dependencies ${spring-cloud.version} pom import org.springframework.boot spring-boot-maven-plugin 贰、添加一个注册中心
在这里,我们需要用的的组件上Spring Cloud Netflix的Eureka ,eureka是一个服务注册和发现模块。
新建一个子工程lovin-eureka-server作为服务的注册中心
lovincloud com.eelve.lovincloud 1.0-SNAPSHOT 4.0.0 lovin-eureka-server jar eurekaserver 0.0.1 eureka服务端 org.springframework.cloud spring-cloud-starter-netflix-eureka-server org.springframework.boot spring-boot-starter-test test org.springframework.cloud spring-cloud-dependencies ${spring-cloud.version} pom import org.springframework.boot spring-boot-maven-plugin - 然后在启动类上添加@EnableEurekaServer注解:
package com.eelve.lovin;
import org.springframework.boot.SpringApplication;
import org.springframework.boot.autoconfigure.SpringBootApplication;
import org.springframework.cloud.netflix.eureka.server.EnableEurekaServer;
/**
- @ClassName LovinEurekaServerApplication
- @Description TDO
- @Author zhao.zhilue
- @Date 2019/8/15 16:20
- @Version 1.0**/
@EnableEurekaServer
br/>**/
@EnableEurekaServer
public class LovinEurekaServerApplication {
public static void main(String[] args) {
SpringApplication.run(LovinEurekaServerApplication.class,args);
}
}- eureka是一个高可用的组件,它没有后端缓存,每一个实例注册之后需要向注册中心发送心跳(因此可以在内存中完成),在默认情况下erureka server也是一个eureka client ,必须要指定一个 server。eureka server的配置文件appication.yml:~~~yamlspring:application:naem: lovineurkaserver # 服务模块名称server:port: 8881 # 设置的eureka端口号eureka:instance:hostname: localhost # 设置eureka的主机地址client:registerWithEureka: false #表示是否将自己注册到Eureka Server,默认为true。由于当前应用就是Eureka Server,故而设置为falsefetchRegistry: false #表示是否从Eureka Server获取注册信息,默认为true。因为这是一个单点的Eureka Server,不需要同步其他的Eureka Server节点的数据,故而设置为falseserviceUrl: defaultZone: http://${eureka.instance.hostname}:${server.port}/eureka/ #Eureka server地址,查询服务和注册服务都需要依赖这个地址,多个地址可用逗号(英文的)分割
叁、添加一个服务消费端
新建一个子工程lovin-eureka-server作为服务的注册中心
lovincloud com.eelve.lovincloud 1.0-SNAPSHOT 4.0.0 lovin-eureka-client jar eurekaclient 0.0.1 eureka的一个消费端 org.springframework.cloud spring-cloud-starter-netflix-eureka-client org.springframework.boot spring-boot-starter-web org.springframework.boot spring-boot-maven-plugin - 然后在启动类上添加@EnableEurekaClient注解:
package com.eelve.lovin;
import org.springframework.boot.SpringApplication;
import org.springframework.boot.autoconfigure.SpringBootApplication;
import org.springframework.cloud.netflix.eureka.EnableEurekaClient;
/**
- @ClassName LovinEurekaClientApplication
- @Description TDO
- @Author zhao.zhilue
- @Date 2019/8/15 16:37
- @Version 1.0**/
@SpringBootApplication
br/>**/
@SpringBootApplication
public class LovinEurekaClientApplication {
public static void main(String[] args) {
SpringApplication.run(LovinEurekaClientApplication.class,args);
}
}- 然后我们需要连接到服务端,具体配置如下~~~yamlserver:port: 8801 # 服务端口号spring:application:name: lovineurkaclient # 服务名称eureka:client:serviceUrl: defaultZone: http://localhost:8881/eureka/ # 注册到的eureka服务地址- 新建一个Controller写一个测试接口
package com.eelve.lovin.controller;
- 新建一个Controller写一个测试接口
import com.eelve.lovin.config.ServerConfig;
import org.springframework.beans.factory.annotation.Autowired;
import org.springframework.web.bind.annotation.RequestMapping;
import org.springframework.web.bind.annotation.RestController;
/**
- @ClassName HelloController
- @Description TDO应用默认访问接口
- @Author zhao.zhilue
- @Date 2019/8/15 16:45
@Version 1.0**/
@RestController
br/>**/
@RestController@Autowired
ServerConfig serverConfig;@RequestMapping("hello")
public String hello(){
return serverConfig.getUrl()+"###"+ HelloController.class.getName();
}
}# 肆、分别启动注册中心的服务端和客户端访问localhost:8881查看结果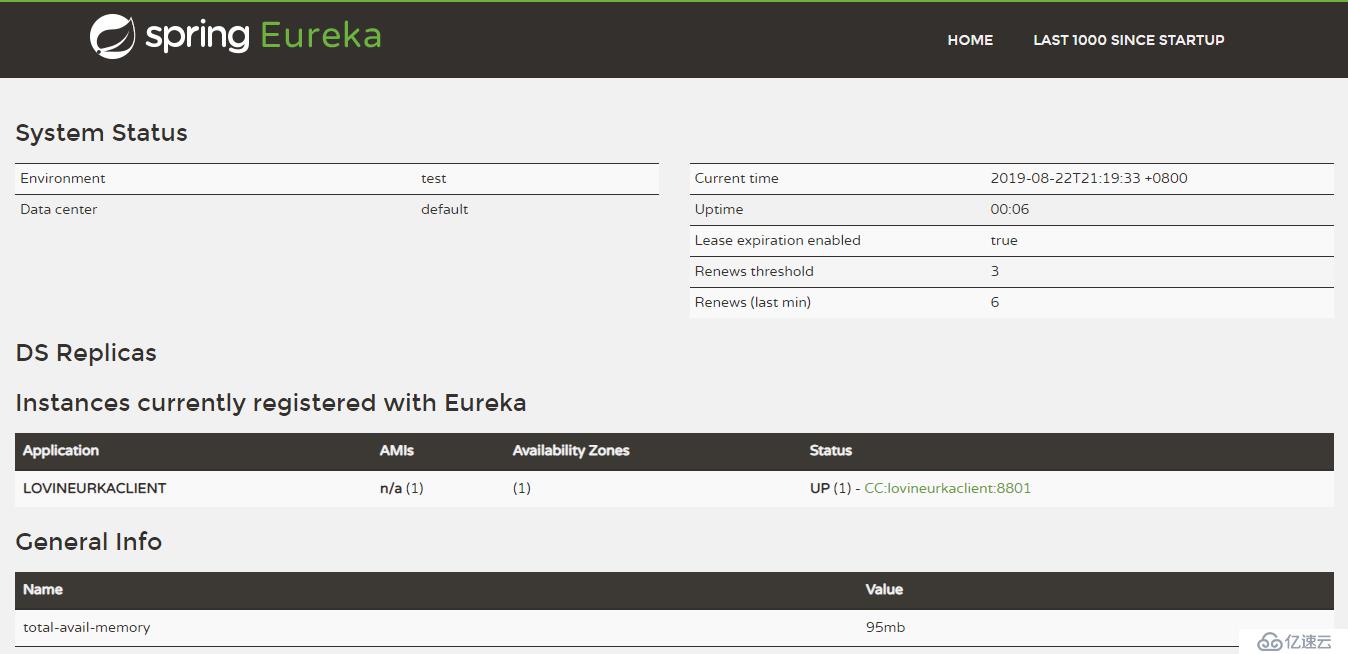到这里我们可以已经看到已经成功将客户端注册到服务端了,然后我们访问测试接口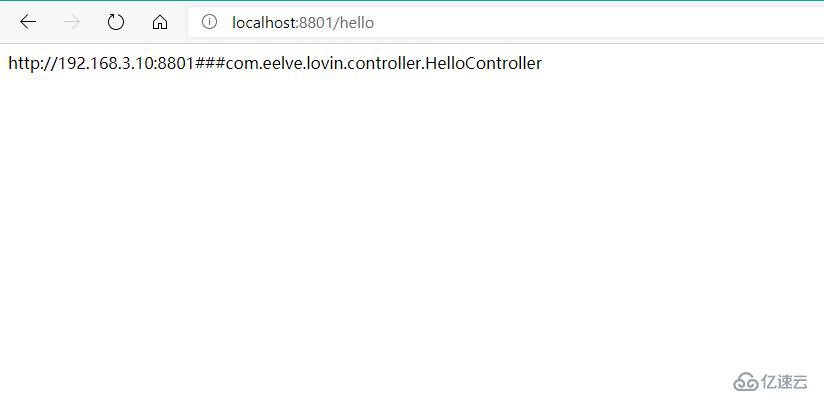可以看到已经访问成功,至此Eureka的搭建已经完成。# 伍、加入安全配置在互联网中我们一般都会考虑安全性,尤其是管理服务的注册中心,所以我们可以用**spring-boot-starter-security**来做安全限制- 给**lovin-eureka-server**添加**spring-boot-starter-security**的pom依赖~~~pomorg.springframework.boot spring-boot-starter-security - 修改配置文件
spring:application:naem: lovineurkaserver # 服务模块名称security:basic:enabled: trueuser:name: lovinpassword: ${REGISTRY_SERVER_PASSWORD:lovin}server:port: 8881 # 设置的eureka端口号eureka:instance:hostname: localhost # 设置eureka的主机地址metadata-map:user.name: ${security.user.name}user.password: ${security.user.password}client:registerWithEureka: false #表示是否将自己注册到Eureka Server,默认为true。由于当前应用就是Eureka Server,故而设置为falsefetchRegistry: false #表示是否从Eureka Server获取注册信息,默认为true。因为这是一个单点的Eureka Server,不需要同步其他的Eureka Server节点的数据,故而设置为falseserviceUrl:defaultZone: http://${spring.security.user.name}:${spring.security.user.password}@${eureka.instance.hostname}:${server.port}/eureka/ #Eureka server地址,查询服务和注册服务都需要依赖这个地址,多个地址可用逗号(英文的)分割 - 添加security配置
package com.eelve.lovin.config;
- 修改配置文件
import org.springframework.context.annotation.Configuration;
import org.springframework.security.config.annotation.web.builders.HttpSecurity;
import org.springframework.security.config.annotation.web.configuration.EnableWebSecurity;
import org.springframework.security.config.annotation.web.configuration.WebSecurityConfigurerAdapter;
/**
- @ClassName SecurityConfig
- @Description TDO
- @Author zhao.zhilue
- @Date 2019/8/16 14:13
@Version 1.0**/
@EnableWebSecurity
br/>**/
@EnableWebSecurity@Override
protected void configure(HttpSecurity http) throws Exception {
http.csrf().disable();
http.authorizeRequests()
.antMatchers("/css/**").permitAll()
.anyRequest().authenticated()
.and()
.formLogin()
.and()
.httpBasic();
super.configure(http);
}
}- 给**lovin-eureka-client**添加**spring-boot-starter-security**的pom依赖~~~pomorg.springframework.boot spring-boot-starter-security - 修改yaml配置文件
server:port: 8801 # 服务端口号spring:application:name: lovineurkaclient # 服务名称security:basic:enabled: trueuser:name: lovinpassword: ${REGISTRY_SERVER_PASSWORD:lovin}eureka:client:serviceUrl:defaultZone: http://lovin:lovin@localhost:8881/eureka/ # 注册到的eureka服务地址instance:leaseRenewalIntervalInSeconds: 10health-check-url-path: /actuator/healthmetadata-map:user.name: lovinuser.password: lovin - 添加security配置
package com.eelve.lovin.config;
- 修改yaml配置文件
import org.springframework.context.annotation.Configuration;
import org.springframework.security.config.annotation.web.builders.HttpSecurity;
import org.springframework.security.config.annotation.web.configuration.WebSecurityConfigurerAdapter;
/**
- @ClassName SecurityConfig
- @Description TDO
- @Author zhao.zhilue
- @Date 2019/8/16 14:13
@Version 1.0**/
@Configuration
br/>**/
@Configuration@Override
protected void configure(HttpSecurity http) throws Exception {
http.authorizeRequests().anyRequest().permitAll()
.and().csrf().disable();
}
}- 另外为了测试多客服端注册,我们可以修改再给客户端新建一个配置文件,然后开启IDEA的多节点运行,如下图所示勾选**Allow parallel run**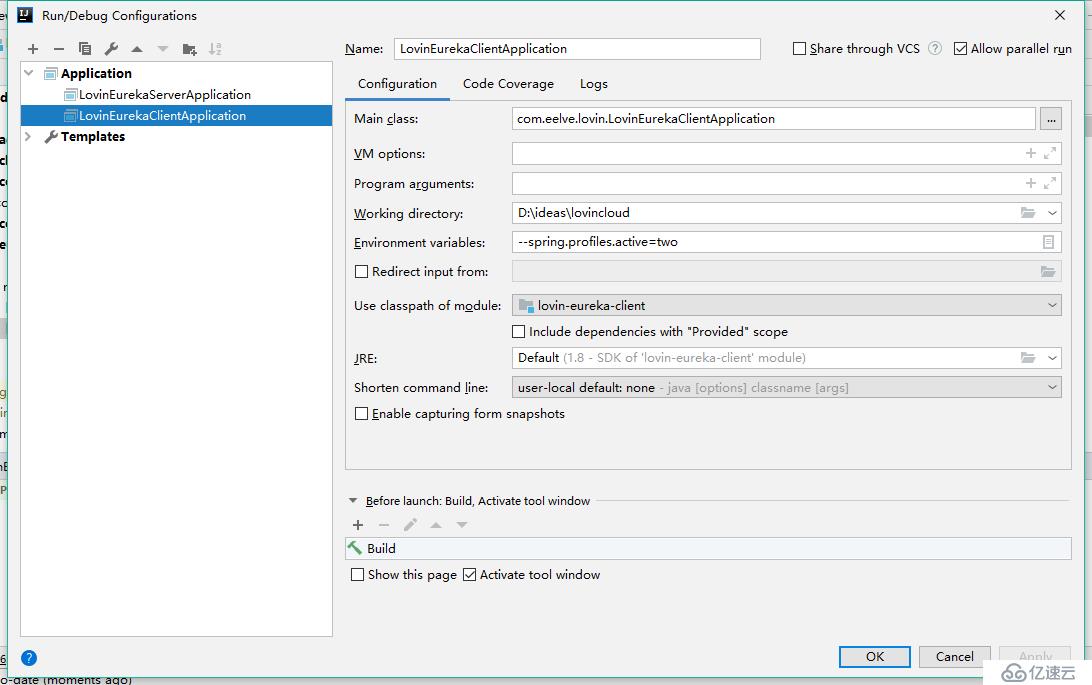- 然后为了区分是哪个节点的请求我们可以添加获取端口~~~javapackage com.eelve.lovin.config;
import org.springframework.boot.web.context.WebServerInitializedEvent;
import org.springframework.context.ApplicationListener;
import org.springframework.stereotype.Component;
import java.net.InetAddress;
import java.net.UnknownHostException;
/**
- @ClassName ServerConfig
- @Description TDO
- @Author zhao.zhilue
- @Date 2019/8/18 12:03
@Version 1.0**/
@Component
br/>**/
@Component
private int serverPort;public String getUrl() {
InetAddress address = null;
try {
address = InetAddress.getLocalHost();
} catch (UnknownHostException e) {
e.printStackTrace();
}
return "http://"+address.getHostAddress() +":"+this.serverPort;
}@Override
public void onApplicationEvent(WebServerInitializedEvent event) {
this.serverPort = event.getWebServer().getPort();
}
}
- 然后我们一次重启服务端和两个客户端,这个时候我们访问http://localhost:8881/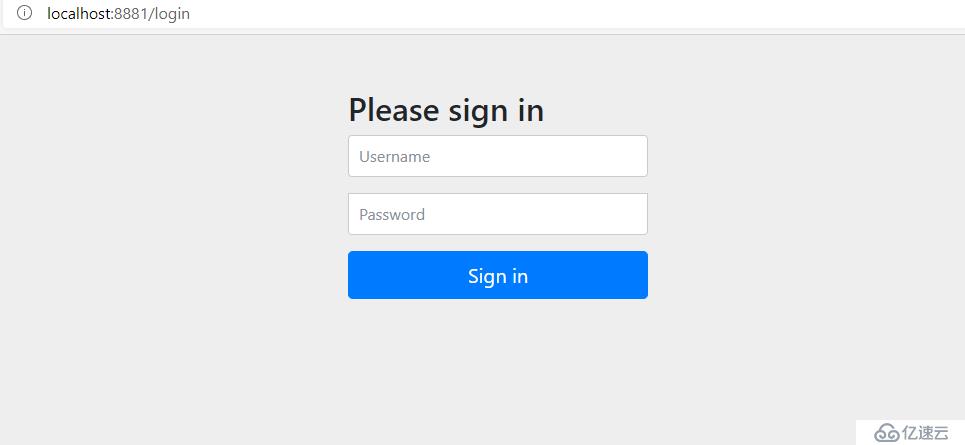可以看到,这里已经让我们输入用户名和密码了,说明**spring-boot-starter-security**已经配置成功,这时我们输入配置的用户名:lovin和密码:lovin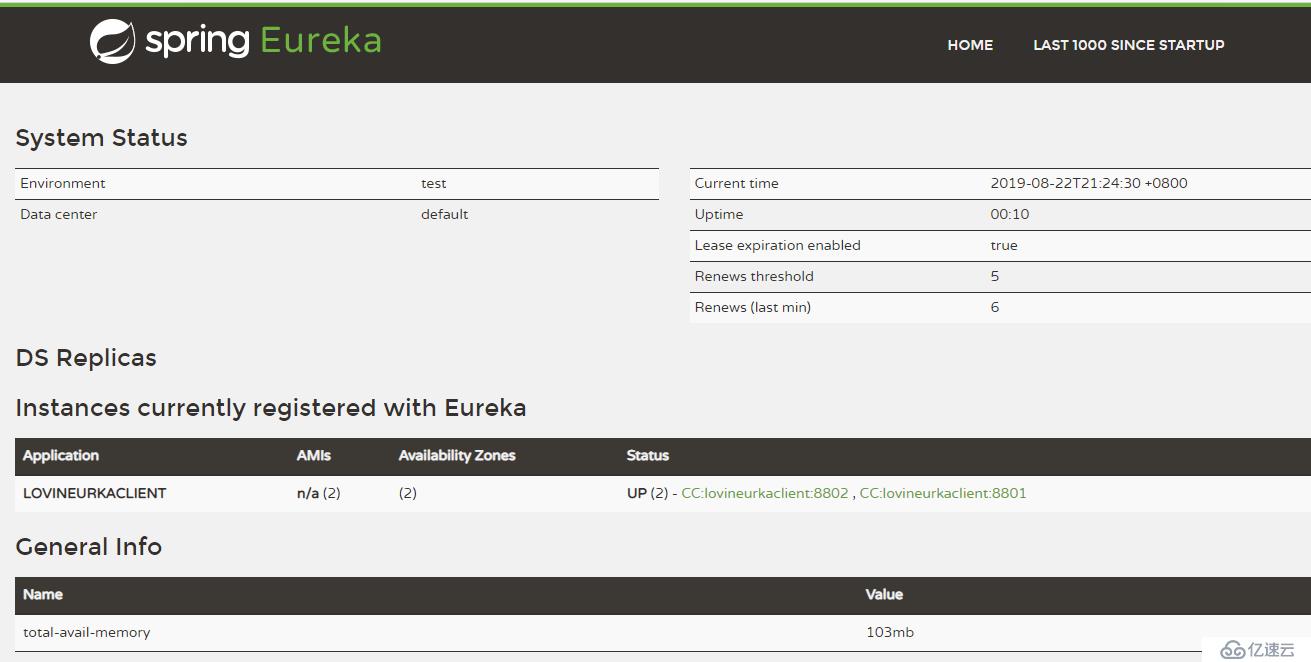这里我们可以看到已经成功了,那么到这里Eureka的配置已经全部成功了。* [最后的最后是本博客的源码,欢迎关注这一套SpringCloud的实践](https://github.com/lovinstudio/lovincloud)